Not Just a Developer
Technology Behind The Blog
Technologies and architecture of this blog

Welcome to my second post! In this one, I'll discuss the technical details that makes my blog work. Let's dive into how everything comes together behind the scenes.
Motivation
My motivation for starting a blog was not only the one I mentioned in my first entry, sharing learnings to make them deeper. If that had been the case, I would have built the website with Wordpress or created a Substack or something similar.
The first time I did serious frontend work was when I had to do my thesis project, which had two web interfaces. I built them using Vue JS, mainly because the person mentoring me at the time only knew this technology. Although I realized that I preferred backend development and infrastructure, I saw that creating cool and visual things was really exciting.
It wasn't so exciting to spend an hour centering an element, which made me feel pretty dumb, but once everything was in place, it was very satisfying. After a few months, during which I didn't have to develop any UI at work, I felt a bit rusty. Additionally, I felt that to enhance some of my side projects, I needed to improve in the UI department, and I was eager to work with a framework with maximum support. This framework was clearly React JS, and the perfect excuse to learn it was to build myself a blog.
Frontend
For the frontend, as I mentioned, I chose React JS, with the help of Next JS for routing and server-side rendering. For CSS styling, I chose Tailwind CSS, which I had already used for my Final Year Project, and although it does clutter the code a bit, I find it highly useful.
As for design, I've noticed that for many developers who have blogs, this is not a priority, but for me, it is. What's the point of creating a UI if it doesn't catch the eye? I've tried to maintain a simple aesthetic, avoiding overloading the screen. As a secondary color, I've chosen orange, as I believe it represents the enthusiasm with which I approach my daily life, and it aligns with the personal brand I want to create.
First, I developed a more or less basic version of the website, without backend, random images, and without animations. Once I had that, I started researching how to animate UIs with React. I used a library that has a syntax that allows creating animations quite simply. It's called Framer Motion, and to see how it works, I'll now include the code needed to animate the welcome robot picture. If you look closely, you'll see that the robot animates from being invisible (opacity 0) to being fully visible, and from a larger size (1.5x) to a smaller one (1x).
const  RobotImage  = () => {
	return (
		<motion.div  initial="initial"  animate="animate"  variants={zoomInOut}>
			<Image
				src="imagesource"
				sizes="60vw"
				style={{ width:  "100%", height:  "auto" }}
			/>
		</motion.div>
	);
};
The animation zoomInOut is declared in another file. Basically, what we do is defining two states, and the library animates from one state to the other.
export  const  zoomInOut  = {
	initial: {
		opacity:  0,
		scale:  1.5,
	},
	animate: {
		opacity:  1,
		scale:  1,
		transition: {
			delay:  0.0,
			duration:  1.5,
		},
	},
};
I'll take this opportunity to mention that both this image and the cover images of my future articles will be generated with text-to-image models. In this case, I've used Playground v2, an open source model.
Another library that has helped me keep my code clean and manage API call caching is RTK Query, which is an add-on for the popular state manager Redux. Before using it, my code had ugly useEffect and reactive variables created by me inside the components that used external data. With this library, I define an API in a separate file that centralizes interaction with it. Let's see what this looks like:
export const awsApi = createApi({
  reducerPath: "awsApi",
  baseQuery: fetchBaseQuery({
    baseUrl: `{https://${id}.execute-api.eu-west-1.amazonaws.com/v1}`,
  }),
  keepUnusedDataFor: 1800,
  endpoints: (builder) => ({
    getArticlesList: builder.query({
      query: () => `articles`,
    }),
    getArticle: builder.query({
      query: (id) => ({
        url: `article/${id}`,
        responseHandler: (response) => response.text(),
      }),
    }),
    subscribe: builder.mutation({
      query(email) {
        const body = { email: email };
        return {
          url: `subscribe`,
          method: "POST",
          body,
        };
      },
    }),
  }),
});

export const {
  useGetArticlesListQuery,
  useGetArticleQuery,
  useSubscribeMutation,
} = awsApi;
One of the main reasons for using this library is that it caches each request. This means that if an API endpoint is called with the same parameters from two different points in the application, the request will only be made once. The second time, the data will be retrieved from the state created by the library. This state has a default lifespan of 1 minute, but in my case, since the content changes infrequently, I've changed it (keepUnusedDataFor variable) to 1800 seconds (30 minutes).
After declaring this API, I can call it and access several very useful variables with the following:
const { data: article, isLoading, isError } = useGetArticleQuery(article_id);
To wrap up, I'd like to mention that the key library for this project is react-markdown. Essentially, it allows me to transform Markdown syntax into HTML code. Why is this crucial? Because it allows me to comfortably write the article with a Markdown editor, and once I have it, I upload it to the storage where I save the articles, and automatically I can access the blog and see it, without worrying about how to render it in the UI. I had to adjust some things and struggle a bit with the library to make it look and render well, though. The component where the magic happens is the following:
function MarkdownRenderer({ children: markdown }) {
  return (
    <Markdown
      className="markdown"
      remarkPlugins={[remarkGfm]}
      rehypePlugins={[rehypeRaw]}
      components={{
        code({ node, inline, className, children, ...props }) {
          const match = /language-(\w+)/.exec(className || "");
          return !inline && match ? (
            <SyntaxHighlighter
              className="text-xs md:text-sm border-2 rounded-md border-gray-300"
              style={style}
              PreTag="div"
              language={match[1]}
              {...props}
            >
              {String(children).replace(/\n$/, "")}
            </SyntaxHighlighter>
          ) : (
            <code className={className} {...props}>
              {children}
            </code>
          );
        },
      }}
    >
      {markdown}
    </Markdown>
  );
}
Most of the code you see is for adding code highlighting. By default, react-markdown doesn't have that functionality, so we have to add logic to parse the language of the code (the format in Markdown is ```language\n [code] \n```), and use another library (react-syntax-highlighter) to display it. I've also created some CSS classes to change the default format of some of the elements generated by the library when parsing Markdown code, and to avoid conflicts with the Tailwind CSS library.
.markdown>* {
  all: revert;
}

.markdown p {
  font-size: 20px;
  text-align: justify;
}

.markdown h1 {
  font-size: 32px;
}

.markdown h2 {
  font-size: 27px;
}
UI Deployment
The solution chosen to host the UI is Vercel. This service integrates seamlessly with my GitHub repository, automatically redeploying the UI every time I commit changes to the main branch. Additionally, setting up HTTPS certificates was straightforward; it only required adding a specific DNS record to the domain registrar's service, and voila, my blog was secured with HTTPS. Also, Vercel offers DDoS protection, ensuring the reliability and security of my website (and pocket).
Best of all, these features come at no cost, unless my website experiences a surge in traffic and exceeds the limitations of the hobby (free) plan.
Backend
The backend part has given me quite a bit to think about. My initial idea was to host the blogs on a platform like Medium or dev.to, but then I realized that if I wanted to eventually add multiple languages, I would need something additional. Since I knew I wanted something reliable and cost-effective, my first thought was to store the blogs in AWS S3 (raw storage service), and access them from the UI.
That's when I realized I had a problem; how would I protect that endpoint? If I left the S3 URL in the browser, someone with malicious intent could see it and start making requests randomly until one day I wake up and see that I have -10000€ in my bank account. Clearly, I don't want that. I know I could put some restrictions (CORS) or try to hide the URL, but none of these solutions gave me 100% confidence that the worst wouldn't happen.
I needed to protect the URL somehow. My solution has been to add AWS Lambda functions that access S3 and are invoked by the AWS API Gateway service. For those who don't know, AWS Lambda is a serverless computing service that allows you to run code without provisioning or managing servers. It charges you based on the number of requests and the duration of the code execution, measured in milliseconds. Why not expose the lambda functions directly? Because the API Gateway service can be directly integrated with other services that protects you from DDOS, and you can also limit the maximum rate of requests that you allow, thus setting an upper limit on the AWS Lambda computing bill (average execution time per call * cost / execution time * maximum allowed calls per second * one month's seconds).
Some of you might be wondering, doesn't AWS allow you to set a cost limit? Surprisingly, no. What AWS allows is to create budgets, and you can add alarms and actions to these budgets. Alarms can be emails (not what I want, what if I don't see the email because I'm sleeping?), and the actions are quite limited.
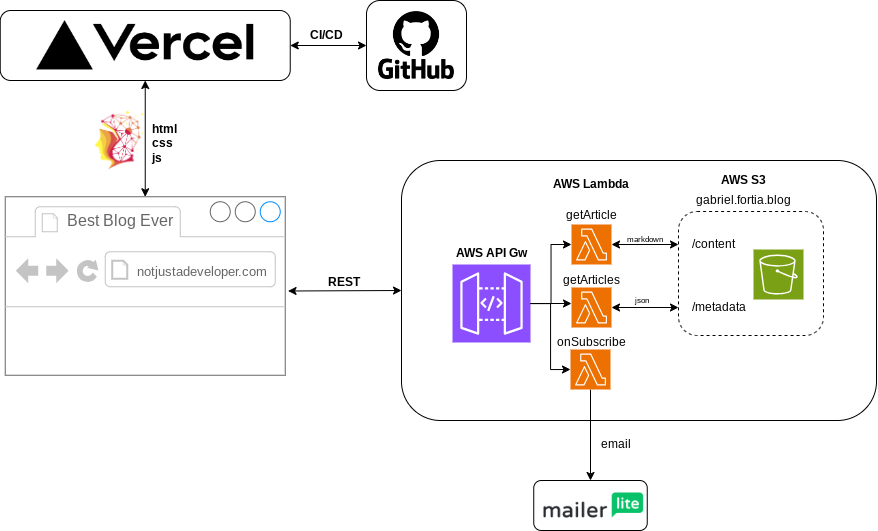
I have an API with three endpoints and three Lambdas. The integration is of type "proxy integration," which means the lambda directly returns the headers, status code, and body of the HTTP response. The chosen language has been Node.js, although initially, I wanted to do it in Go, the testing and implementation environment for AWS Lambda is more complex than with other languages. Since I wanted to have something quickly, I finally opted for Node.
Regarding S3, I have a bucket with two "folders," one with files titled [blog_id].json with the metadata of the posts (title, cover, publication date...), and another with the markdown of each post titled [blog_id].md. What I do is for the /articles page, I get the list of all the posts and display them, and on the /article/[article_id] page, I retrieve the markdown from the specific file.
Here's an example of the code used to retrieve an article from S3:
import { S3 } from '@aws-sdk/client-s3';

const s3 = new S3({ region: 'eu-west-1' });

export const handler = async (event) => {
    const id = event.path.split('/')[2];

    try {
        const params = {
            Bucket: 'gabriel.fortia.blog',
            Key: `content/${id}.md`
        };

        const data = await s3.getObject(params);

        const markdownContent = await data.Body.transformToString();

        return {
            statusCode: 200,
            headers: {
                'Content-Type': 'text/markdown',
                'Access-Control-Allow-Origin': 'https://notonlyadeveloper.com'
            },
            body: markdownContent,
        };
    } catch (err) {
        console.error(err);
        return {
            statusCode: 500,
            body: JSON.stringify({ message: 'Error fetching markdown file' })
        };
    }
};
What about SSR?
SSR stands for Server Side Rendering. If the server hosting the website made requests to AWS, rendered the components with the obtained information, and sent it to the frontend, then the AWS URL wouldn't be exposed to the browser, and I wouldn't have the problem I mentioned. At first, I didn't consider it because I wasn't entirely clear about it. I knew that Next JS had some functionality related to SSR, but I hadn't explored it thoroughly.
Looking back after having implemented everything and having it working, I realize how interesting this option is. Additionally, I've discovered that with Next JS, I can create a special build so that when the build is done, all possible calls are made, transforming the website from dynamic to static (SSG). The downside is that every time I add an article, I'll have to redeploy, but since deploying with Vercel is so easy and I'm not going to upload an article every day, it seems like a great option.
It's possible that a future article will reference this whole world of Server Side Rendering and Static Site Generation, and how I've used it to improve the blog.
Closing
And that wraps up my second post! I've gained a ton of knowledge throughout the development process, which has been incredibly rewarding. Managing everything with AWS services seems straightforward, but getting all the formats and permissions just right can be quite the challenge, especially with the sometimes tricky AWS documentation.
And that's it for my second post! During the development of this project I learned a lot, I am happy because of that. The cloud part, although very silly, putting everything in the formats and with the permissions that each service requires is not trivial at all. Especially with AWS documentation that for certain things...
As for React, I have to say that I liked it from the very beginning. It has a lot of support and being able to mix html and js however you want makes it very easy to use.
Although this is how I have it today, that doesn't mean it is not going ot change in the future. The next thing I will be working on is on SEO. I would like the blog to show up when you search for my name. I will also further research on SSR and SSG to see how can I use them to better solve the problems that I encountered. I am also planning to add a "Subscribe" page to be able to receive email notifications on new blog post releases.
Thanks for reading!
Gabriel Fortià, Not Just a Developer.